Windows 11 配置 ssh-agent,秘钥登录自动填写key口令

ssh-agent 可以保存 ssh 秘钥的口令,让我们用 ssh 秘钥登录时,不需要输入秘钥的口令。

Windows 安装 git 后, 其带的 OpenSSH 被安装到 C:\Windows\System32\OpenSSH 文件夹,但是 ssh-agent 服务没有启动。

打开管理员权限的 Power Shell,输入命令:

1
2
3
4
# 把 `ssh-agent` 添加为开机自启动的系统服务
Set-Service ssh-agent -StartupType Automatic
# 启动 ssh-agent 服务
Start-Service ssh-agent

这样我们就把 ssh-agent 添加为开机自启动的系统服务了。

1
2
3
4
5
# 把私钥加入 ssh-agent
ssh-add .ssh\id_rsa

# 查看已加入 ssh-agent 的私钥
ssh-add -l

Windows 下设置 GitHub 2FA

1、安装认证器

在 Microsoft Store 搜索 OTPKEY Authenticator 并安装。

如果你用 iPhone,可以用 Microsoft Authenticator APP,安卓的很多 APP 要通过谷歌应用商店安装,国内太麻烦,不如直接用 Windows 的方便。

2、打开设置 2fa 二维码

电脑浏览器登录GitHub账号 -> “Settings” -> “Password and authentication” -> “Enable two-factor authentication” -> “Set up using an app” -> “Continue”,看到一个二维码。

3、设置 OTPKEY Authenticator
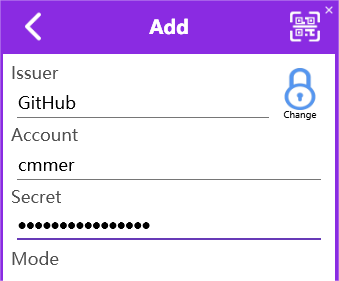
2fa

Windows 打开 OTPKEY Authenticator 程序,点击右上角的加号,然后再点右上角的二维码形状图标,把弹出窗口拖到上一步的二维码上,将自动填入到 Secret 输入框,再把前面两个输入框填完后点“ADD”,你将看到一串6位的数字。

把6位数字输入到 “Verify the code from the app” 输入框 -> “Download”,保存恢复代码 -> “I have saved my recovery codes” -> “Done”,设置完成。

4、2FA 登录

用账号密码登录 GitHub 后,Windows 打开 OTPKEY Authenticator 程序,看到6位数字,在浏览器输入该6位数字即可登录成功。

如果 OTPKEY Authenticator 打不开或不能生成验证码,可用前面下载的恢复吗登录。

配置 GitHub 通过 SSH 秘钥连接

1. 生成key

1
2
ssh-keygen -t ed25519 -f ~/.git/github_auth -C '备注,可用邮箱'

2. 添加秘钥到 ssh-agent

如果自定义了秘钥文件名,就需要把秘钥添加到 ssh-agent 中。

1
2
3
ssh-add ~/.ssh/github_auth
# 如果秘钥有口令,则加上 -K 参数,输入口令后,就不用每次连接都要输入 key 口令
ssh-add -K ~/.ssh/github_auth

这一步也可以通过 ssh config 文件来显式设置域名用指定的秘钥

1
2
3
4
5
6
7
vim ~/.ssh/config

# 加入下面的内容

Host github.com # ssh 主机名
HostName github.com # 连接域名或IP
IdentityFile ~/.ssh/github_auth # 私钥路径

3. 添加秘钥到 GitHub 账户

个人中心 Settings -> SSH and GPG keys -> New SSH Key

~/.ssh/github_auth.pub 内容粘贴到 Key 输入框。

4. 验证

用一下命令验证是否配置成功。

1
ssh -T git@github.com

注:

安装好 git 后,需要先设置全局用户名和邮箱才能使用。

1
2
3
git config --list
git config --global user.name "Your Name"
git config --global user.email "youremail@yourdomain.com"

PhpStorm / WebStorm WSL 前端开发环境配置

1、创建项目

WSL 中用 npm 创建 vue 项目。

(不用 pnpm 是因为:用 WSLpnpm 安装 node 包后,Windows 下的 PhpStorm 2023.2.1 识别不出,希望官方能早点解决。)

1
2
3
npm create vite@latest my-vue-app -- --template vue
cd my-vue-app
npm i

2、打开项目

wsl 前端开发

用 PhpStorm/WebStorm 打开 WSL 项目。

3、配置 Node.js 和 npm

wsl 前端开发

打开 Node.js 和 npm 配置,解释器选择 WSL 上的 Debian /usr/bin/node,包管理器选择 WSL 上的 npm

4、运行开发环境

wsl 前端开发

打开 PhpStorm 的终端窗口,终端自动进入 WSL 上的项目文件夹,输入 npm run dev 启动开发服务器,支持热加载。用浏览器打开 http://localhost:5173/ 浏览页面,编辑 src/components/HelloWorld.vue 文件,不需要刷新就能看到页面热更新。

解决 Windows 系统设置代理 Chrome 不能访问 Google 的问题

Chrome 不能单独设置代理而是用系统代理,据说 Windows 系统设置的代理是 socks4 代理,开系统代理后,用 Chrome 打不开 Google,Chrome 登录不了 Google 账号。

开系统设置代理后,虽然打不开 gooogle.com,但是可以打开这个 chrome 应用商店:

1
https://chrome.google.com/webstore/category/extensions

这样我们就可以先安装 Chrome 代理插件,再在 Chrome 彩礼插件中设置 socks 5 代理。

我装了 FoxyProxy Standard 代理,可行。

如果只需要上网,可以用 Firefox,它有设置代理的地方。
如果只是为了使用 Chrome 扩展,可以用 Edge,Edge 使用和 Chrome 一样的内核,可以从 Chrome 官网安装插件,也可以从 Edge 官网安装插件。

PHPStorm 配置 WSL PHP 开发文件

WSL 跨文件操作性能比较差,WSL Debian PHP 解释器执行 Windows 上的代码速度会很慢,因此 PHP 项目代码要保存在 WSL Debian 中。

1、打开项目文件夹

点击 PHPStorm 的 文件 > 打开,选择 \wsl$\Debian 目录,找到 WSL Debian 系统上的项目文件夹,这样就可以打开 WSL Debian 上的项目文件夹了。

2、WSL Debian 安装 PHP

1
2
3
4
sudo apt update
sudo apt install php php-dev php-gd php-curl php-mysql \
php-mbstring php-redis php-xdebug php-intl php-zip \
composer
阅读更多

Debian 通过 APT 安装 PHP

用 WSL Debian 12 安装 php 做开发,apt 的 PHP 版本足够新,安装非常方便。
如果 Debian 版本比较老,建议参考这里通过源码编译安装PHP

1
2
sudo apt install php php-dev php-gd php-curl php-mysql \
php-mbstring php-redis php-xdebug php-intl php-zip

安装 swoole

1
sudo pecl install swoole

修改配置

1
sudo vim /etc/php/8.2/cli/php.ini

加入:

1
extension=swoole.so

Debian 通过 APT 安装 MariaDB

在开发环境完全可以用 MariaDB 代替 MySQL,而且安装更方便。

1
2
3
4
5
6
7
8
9
10
11
# 更新索引包
sudo apt update
# 安装 MariaDB 软件包
sudo apt install mariadb-server
# 配置 MariaDB
sudo mysql_secure_installation
# 启动服务
sudo service mariadb start

# 查看服务状态
sudo service --status-all

服务状态显示例如:

1
2
3
4
5
6
7
8
9
[ + ]  cron
[ - ] hwclock.sh
[ + ] kmod
[ + ] mariadb
[ + ] networking
[ + ] procps
[ - ] rsync
[ - ] sudo
[ + ] udev
  • [ + ] 为已启动
  • [ - ] 为未启动

配置文件位置:

1
/etc/mysql/debian.cnf

WSL 迁移发行版文件位置

迁移 wsl 系统的文件位置的方法是:导出再导入。我这里操作的发行版是 Debian,你根据需要更换就可以,如 Ubuntu。

1、停止 wsl 运行的虚拟机

1
2
3
4
5
# 停止全部虚拟机
wsl --shutdown

# 只停止 Debian
wsl -t Debian

2、导出

导入导出有两种模式,一种是导出 tar 文件,再把 tar 文件导入到指定的文件夹,生成新的虚拟硬盘;另一种是导出 vhdx (虚拟硬盘)文件,再把虚拟硬盘导入,继续使用该虚拟硬盘。我们用第二种方法操作。

1
wsl --export Debian D:\WSL\Debian-12-ext4.vhdx --vhd

也可以直接把 C:\Users\[user]\AppData\Local\Packages\[distro]\LocalState\[distroPackageName]\ext4.vhdx 复制到指定位置再导入。

3、卸载掉要迁移的发行版

1
wsl --unregister Debian

4、导入

1
wsl --import-in-place Debian D:\WSL\Debian-12-ext4.vhdx

5、设置默认用户

如果不设置,默认将用 root 用户登录。

1
Debian config --default-user <username>

Debian 12 设置使用清华镜像源

Debian 官方源网速太慢,换成国内源必不可少。

1、安装 apt https 支持

1
sudo apt install apt-transport-https ca-certificates

2、修改源

先备份 /etc/apt/sources.list,然后把其内容替换为:

1
2
3
4
5
6
7
8
9
10
11
12
13
14
15
# 默认注释了源码镜像以提高 apt update 速度,如有需要可自行取消注释
deb https://mirrors.tuna.tsinghua.edu.cn/debian/ bookworm main contrib non-free non-free-firmware
deb-src https://mirrors.tuna.tsinghua.edu.cn/debian/ bookworm main contrib non-free non-free-firmware

deb https://mirrors.tuna.tsinghua.edu.cn/debian/ bookworm-updates main contrib non-free non-free-firmware
deb-src https://mirrors.tuna.tsinghua.edu.cn/debian/ bookworm-updates main contrib non-free non-free-firmware

deb https://mirrors.tuna.tsinghua.edu.cn/debian/ bookworm-backports main contrib non-free non-free-firmware
deb-src https://mirrors.tuna.tsinghua.edu.cn/debian/ bookworm-backports main contrib non-free non-free-firmware

# deb https://mirrors.tuna.tsinghua.edu.cn/debian-security bookworm-security main contrib non-free non-free-firmware
# deb-src https://mirrors.tuna.tsinghua.edu.cn/debian-security bookworm-security main contrib non-free non-free-firmware

deb https://security.debian.org/debian-security bookworm-security main contrib non-free non-free-firmware
deb-src https://security.debian.org/debian-security bookworm-security main contrib non-free non-free-firmware

备注